
Set up GA4 on Your Website
In this article, I explain how to create a Google Analytics 4 (GA4) property and capture your traffic data by installing a GTAG or GTM code snippet on your website for the most common installation scenarios. To determine whether you need GTAG or GTM, refer to my comparison.
Before you start, you need to know if you have Universal Analytics installed on your website. If you are not sure, use my detailed guide.
What do I need for GA4 Installation?
For GA4 installation, you will need logins for the following services:
- Login to Google Analytics (analytics.google.com)
- If you are using GTM installation (tagmanager.google.com), a login for that service
- Login into the backend of your website (e.g. a WordPress login) to add/replace your code snippet
GA4 Installation Decision Matrix
These instructions are specific to your circumstances and we personally tested them to make sure your new tag correctly feeds data to your Google Analytics property.
I don’t have Google Analytics installed
I have Google Analytics Installed
I have a GTAG on my website
I have a GTM- container on my website
GA4 Installation Instructions
New GTAG Installation
Process overview:
- Create a GA4 Property in Google Analytics
- Install the tag snippet on your website
- Validate your installation
Create a GA4 Property in Google Analytics
- Log into analytics.google.com.
- Create a GA4 Property:
- If you never created a Google Analytics Account, a welcome page appears. Click on Start Measuring. You will be asked to name your account – generally, it’s your domain name.
- If you already have a Google Analytics account, click on Admin in the lower left corner. Choose or create your Account, and then click on Create Property.
- In the Property Setup, name your property. I recommend naming it as your domain name and GA4. Answer your business questions. Accept the terms.
- You are now in the Admin=> Property => Data Stream menu. Choose Web Data Stream for collecting web data. Alternatively, you may choose iOS/Android option if you have corresponding apps.

5. Populate your website URL and name, keep the enhanced measurement toggle on, and click on Create Stream.
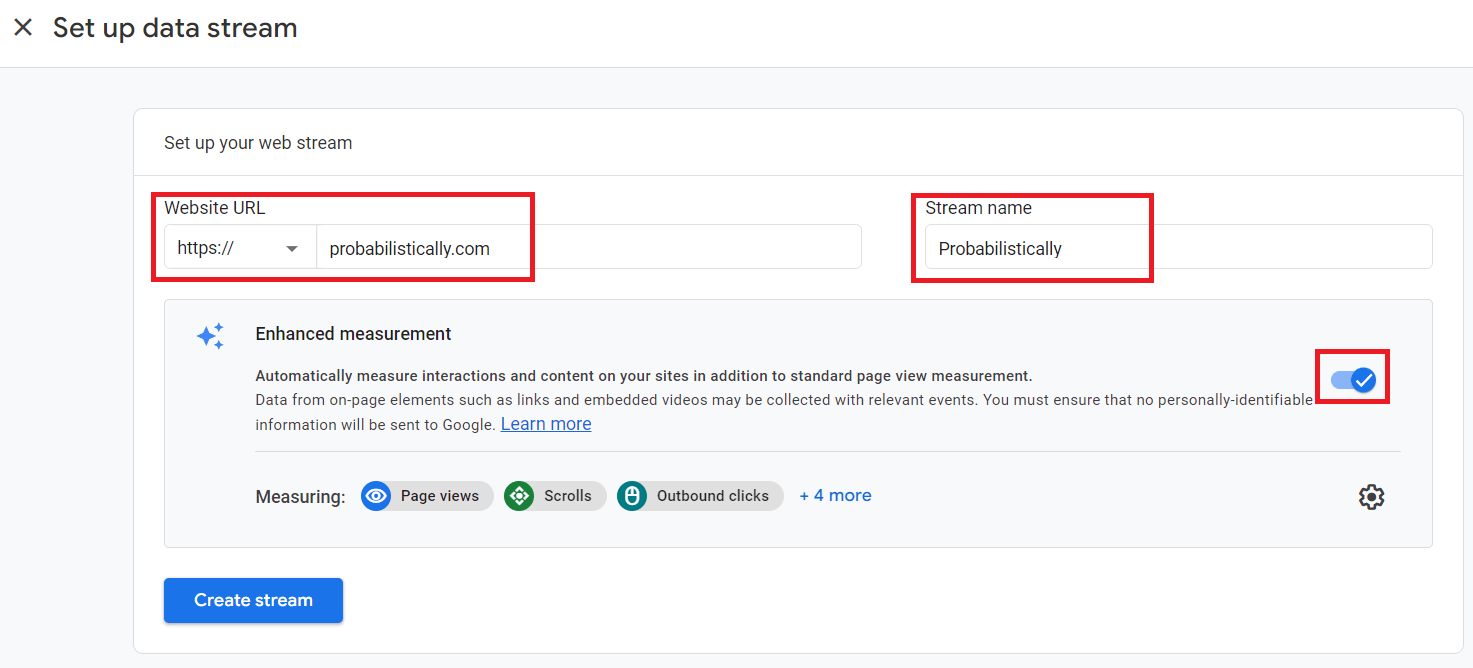
6. In the web data stream, you will Google tag installation instructions appear on top of the page.
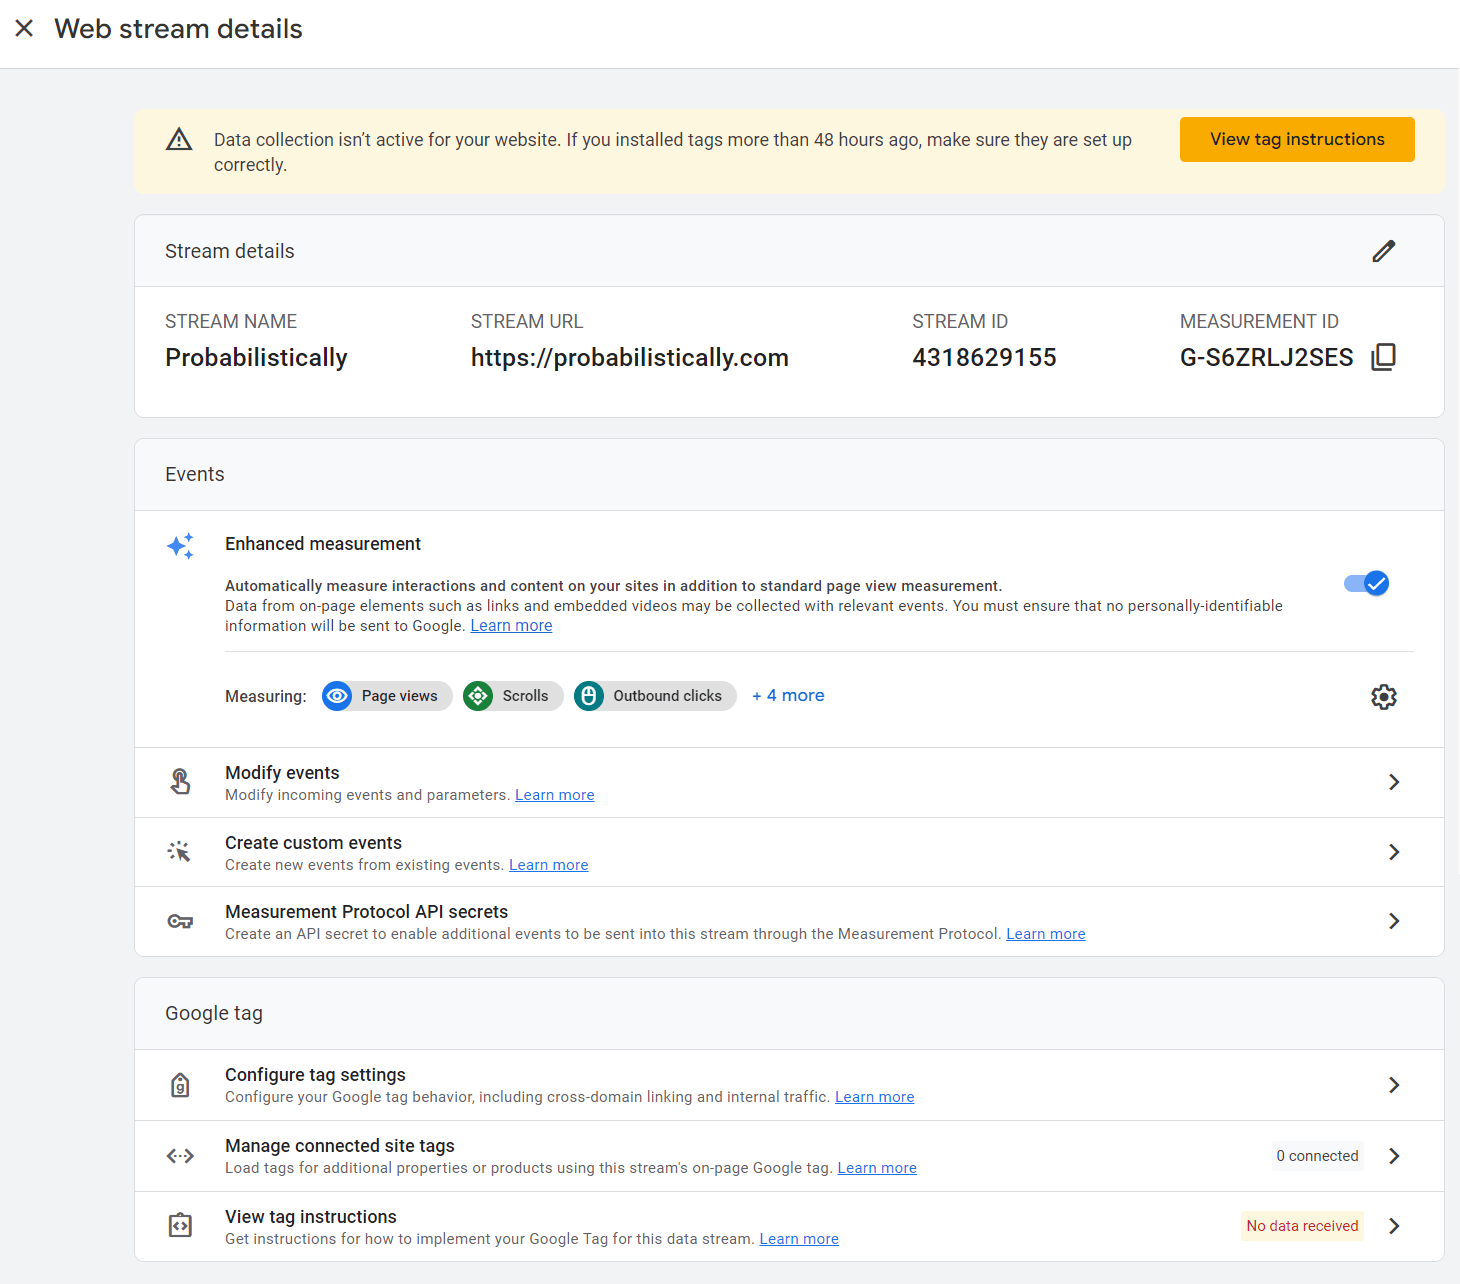
Install the GTAG snippet on your website
- Your GTAG snippet instructions appear either on top of the Web Stream page or can be located at the bottom of the Web Stream page, under View Tag Instructions.
- The Install with a website builder or CMS option will provide instructions for several specific builders and WordPress plugins.
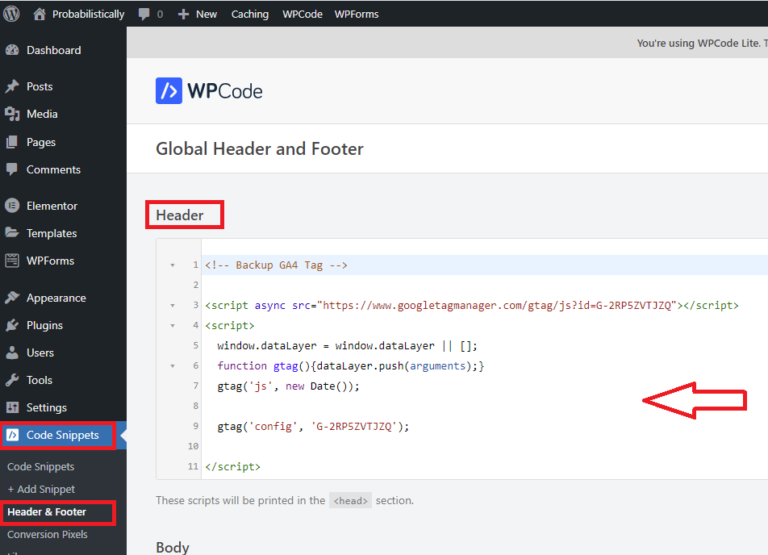
- Alternatively, Install manually option gives you the snippet to install using Header and Footer plugins or manually adding to the page code. Add the snippet to <head> of every page.
Below is an example of GTAG installation using Code Snippets plugin that I use on my own website:
Validate Your Installation
New GTM Tag and Snippet Installation
Process overview:
- Create a GA4 Property in Google Analytics
- Create GA4 Configuration Tag in Google Tag Manager
- Install the tag snippet on your website
- Validate your installation
Create a GA4 Property in Google Analytics
- Log into analytics.google.com.
- Create a GA4 Property:
- If you never created a Google Analytics Account, a welcome page appears. Click on Start Measuring. You will be asked to name your account – generally, it’s your domain name.
- If you already have a Google Analytics account, click on Admin in the lower left corner. Choose or create your Account, and then click on Create Property.
- In the Property Setup, name your property. I recommend naming it as your domain name and GA4. Answer your business questions. Accept the terms.
- You are now in the Admin=> Property => Data Stream menu. Choose Web Data Stream for collecting web data. Alternatively, you may choose iOS/Android option if you have corresponding apps.

5. Populate your website URL and name, keep the enhanced measurement toggle on, and click on Create Stream.

6. From the web data stream detail page, copy your Measurement ID.

Create GA4 Configuration Tag in Google Tag Manager
- Log into tagmanager.google.com
- If you don’t have a GTM account for this website, click on Create Account.
- Provide an [arbitrary] account and container names. I use domain/subdomain names.
- Choose Web planform since you will be installing the tag on the website. If you have AMP or iOS/Android app, you may use GTM with them by choosing a corresponding option.
- Click on Create and Accept the Terms.
You will be provided with the GTM snippet and instructions on how to install it. Let’s put them aside for now. - In the Workspace, click on Tags menu -> New. I recommend naming this tag GA4 Configuration with your website name.
- In Tag Configuration, choose Google Analytics: GA4 Configuration tag type.
- Paste your GA4 Measurement ID in the measurement ID field.
- In Triggering, choose All Pages. Click Save.
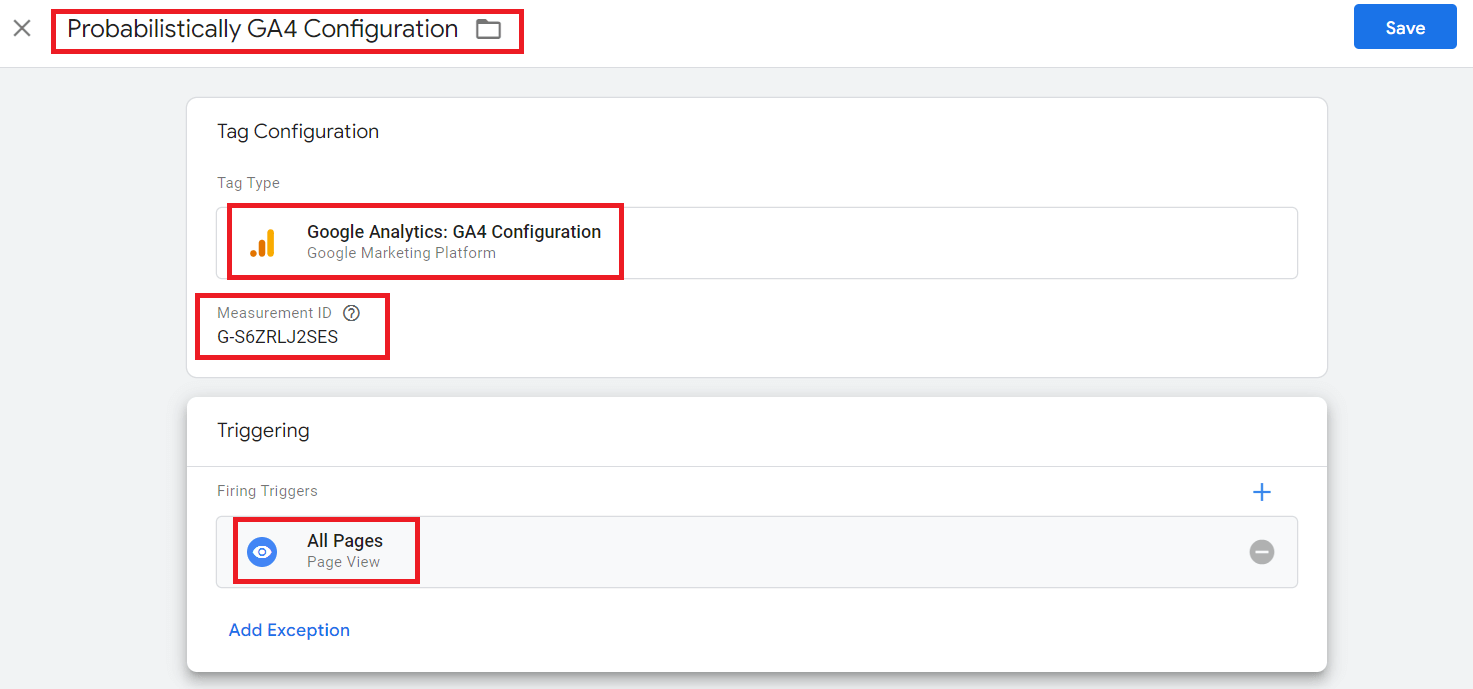
10. To submit changes to your GTM, click Submit. Name your first version GA4 Configuration. Click on Publish.
Install the GTM snippet on your website
Your GTM snippet is accessible by clicking on the Container ID at the top of the Workspace page.
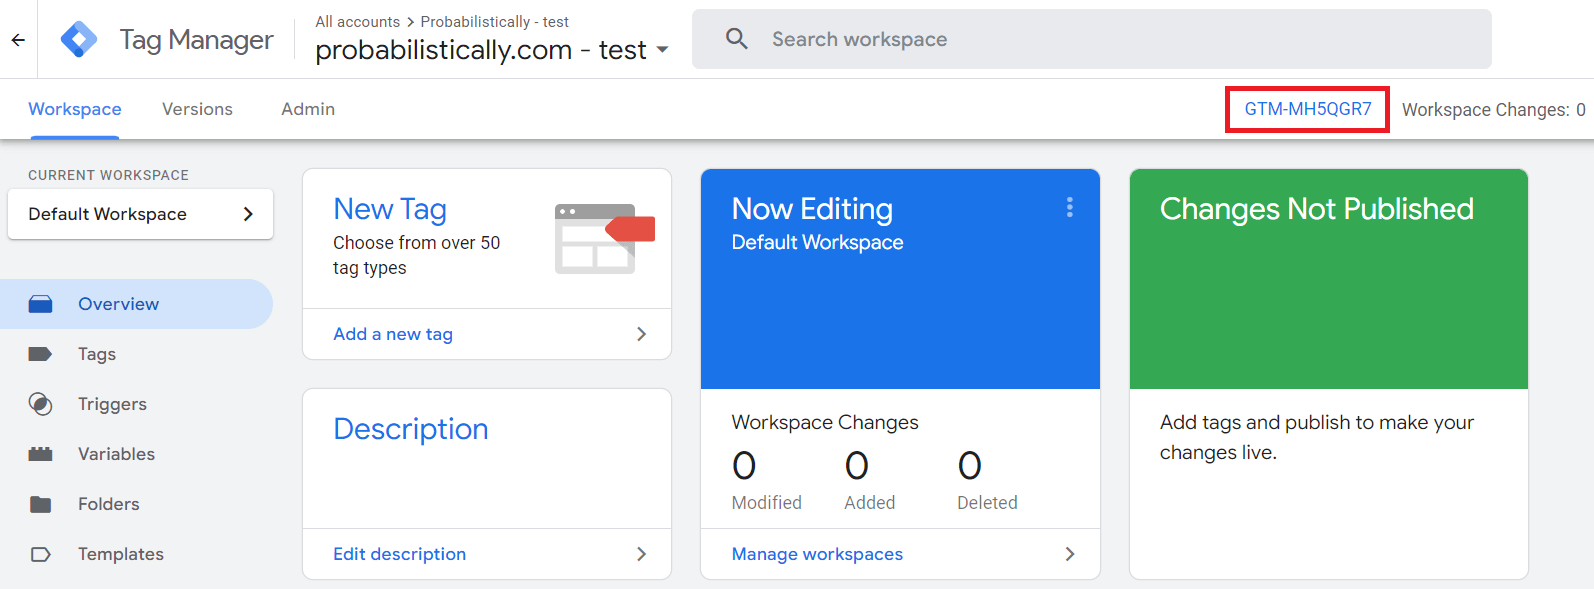
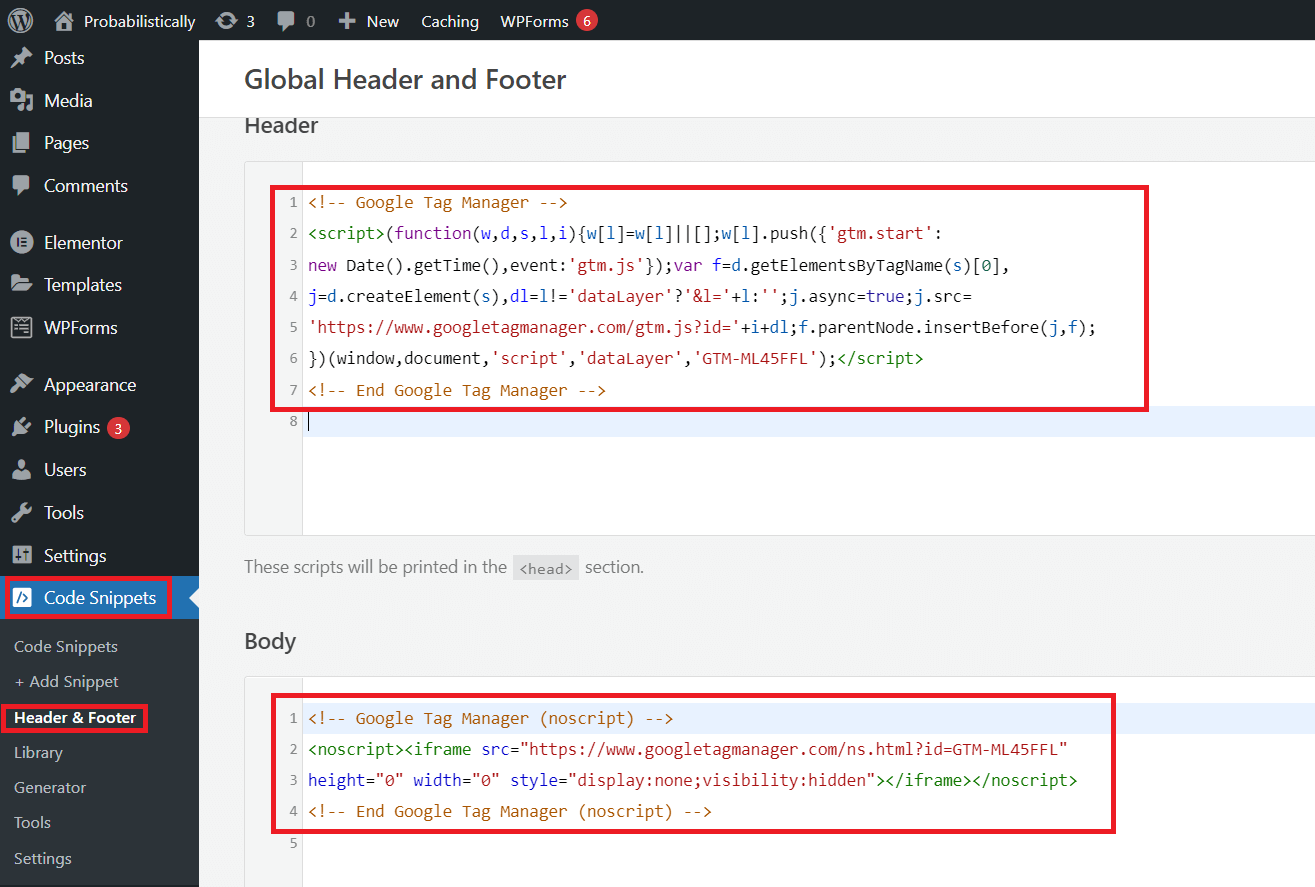
Access the backend of your website or Google’s directions for various web builders. Below is an example of GTAG installation using Code Snippets plugin that I use on my own website:
Validate Your Installation
Replace a GTAG with a GTM Snippet
You can switch from GTAG to a GTM container on your site without the loss of data and ensuring continuity of reporting in the same Google Analytics property.
Process overview:
- Set up a Google Tag Manager container
- Install the GTM snippet on your website
- Validate your installation
In June 2023, Google automatically created GA4 properties for all Universal Analytics clients that have not switched to GA4. They also rigged the UA tag to feed the data to GA4 property. Check if you already have a GA4 property created by Google before you proceed.
Set up Google Tag Manager container
- Log into tagmanager.google.com
- If you don’t have a GTM account for this website, click on Create Account.
- Provide an [arbitrary] account and container names. I use domain/subdomain names.
- Choose Web planform since you will be installing the tag on the website. If you have AMP or iOS/Android app, you may use GTM with them by choosing a corresponding option.
- Click on Create and Accept the Terms.
You will be provided with the GTM snippet and instructions on how to install it. Let’s put them aside for now. - Log into Google Analytics. Go to Admin=> Property => Data Stream menu. Choose Web Data Stream for collecting web data. From the web data stream detail page, copy your Measurement ID.

- Switch back to tagmanager.google.com
- In the Workspace, click on Tags menu -> New. I recommend naming this tag GA4 Configuration with your website name.
- In Tag Configuration, choose Google Analytics: GA4 Configuration tag type.
- Paste your GA4 Measurement ID in the measurement ID field.
- In Triggering, choose All Pages. Click Save.

- To submit changes to your GTM, click Submit. Name your first version GA4 Configuration. Click on Publish.
Install the GTM snippet on your website
Your GTM snippet is accessible by clicking on the Container ID at the top of the Workspace page.

Access the backend of your website and swap the old GTAG for your new GTM container snippet. You can use Google’s directions for various web builders. Below is an example of GTM container installation using Code Snippets plugin that I use on my own website:

Note that your website will start collecting data through GTM container once it is installed on your site. Simply creating a GTM container configured to send the data to your Google Analytics does not change the operation of your GTAG.
Validate Your Installation
Replace a GTM Tag with GTAG
Please note that removing your GTM snippet and replacing it with GTAG will stop collecting any events not standard for GA4 measurement (pageviews, general scrolls, general clicks, video views).
Process overview:
- Get your GTAG code snippet from Google Analytics
- Replace the tag snippet on your website
- [Optional] Replace your non-standard GTM events with custom events in GA4
- Validate your installation
Get your GTAG snippet from Google Analytics
- Log into analytics.google.com.
- Click Admin in the lower left corner. Go to Admin=> Property => Data Stream menu. Choose Web Data Stream for collecting web data. Alternatively, you may choose iOS/Android option if you have corresponding apps.
- In the web data stream, you will Google tag installation instructions generally appear on top of the page (yellow box) or at the bottom of the page under View Tag Instructions. Copy tag instructions.

Replace GTM container with the GTAG snippet on your website
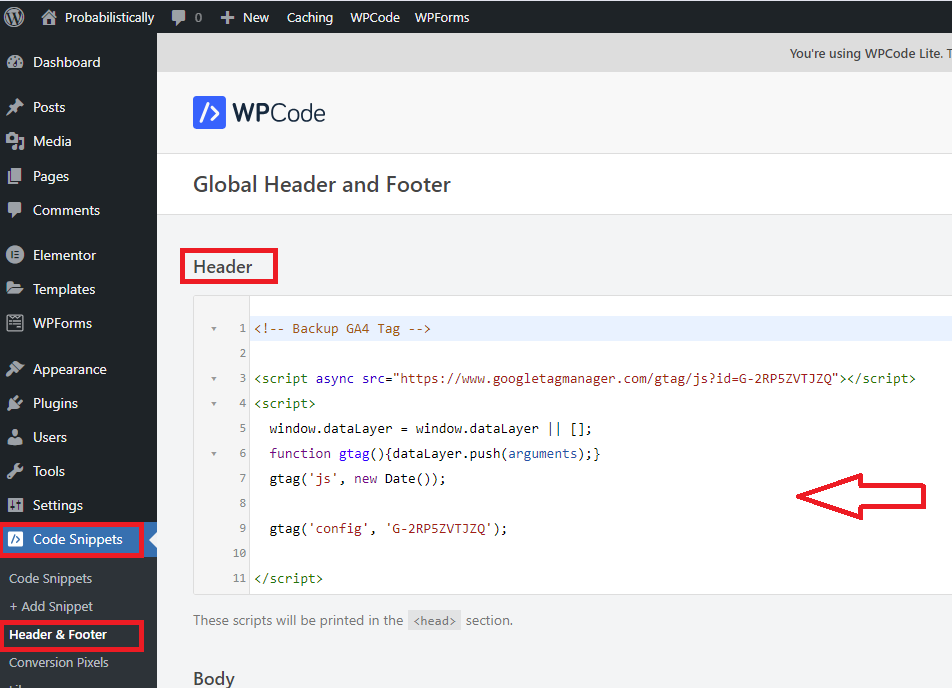
Delete the GTM tag snippet and replace it with the new GTAG snippet in the head of your site. You can use Google’s directions for various web builders.
Below is an example of GTAG installation using Code Snippets plugin that I use on my own website:
[Optional] Replace GTM events with Custom GA4 events
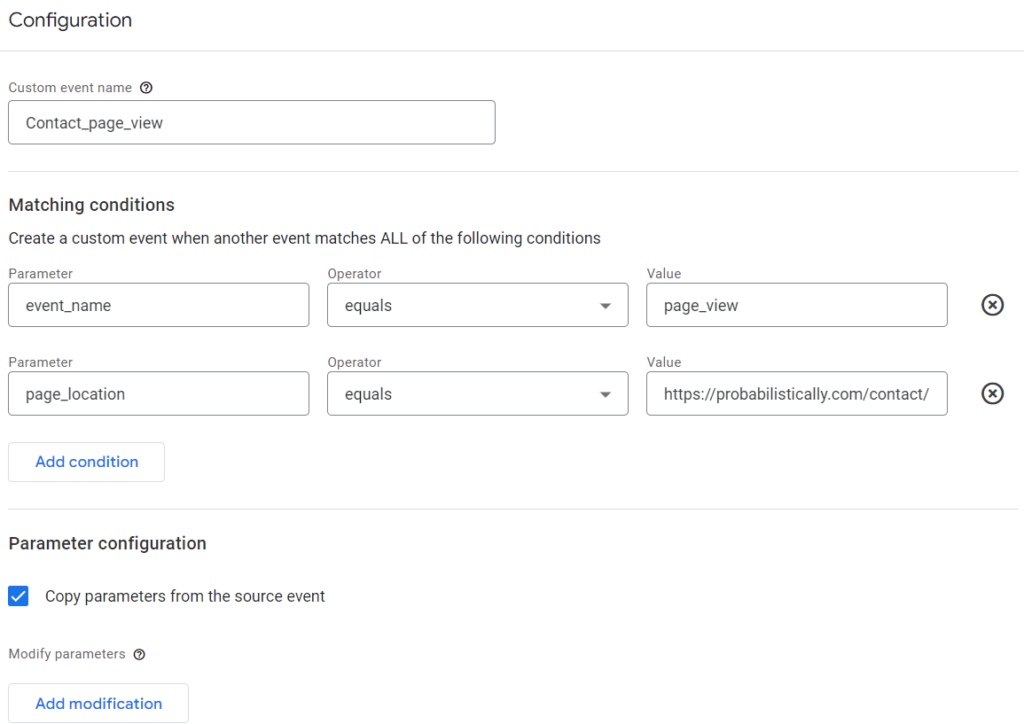
If you used custom GTM events, you can migrate some of them into GA4 without the use of GTM. Specifically, a filter can be applied to a standard GA4 event, and it will produce a new event. This is particularly helpful for conversion events that are views of specific pages.
- In analytics.google.com Admin=>Your GA4 Property menu choose Events => Create Event.
- Give your event a name, and use the fields to specify which type of standard events you want to filter and by which variable. Click Create.
Validate Your Installation
Google Analytics Installation Validation
Validate GA4 Installation
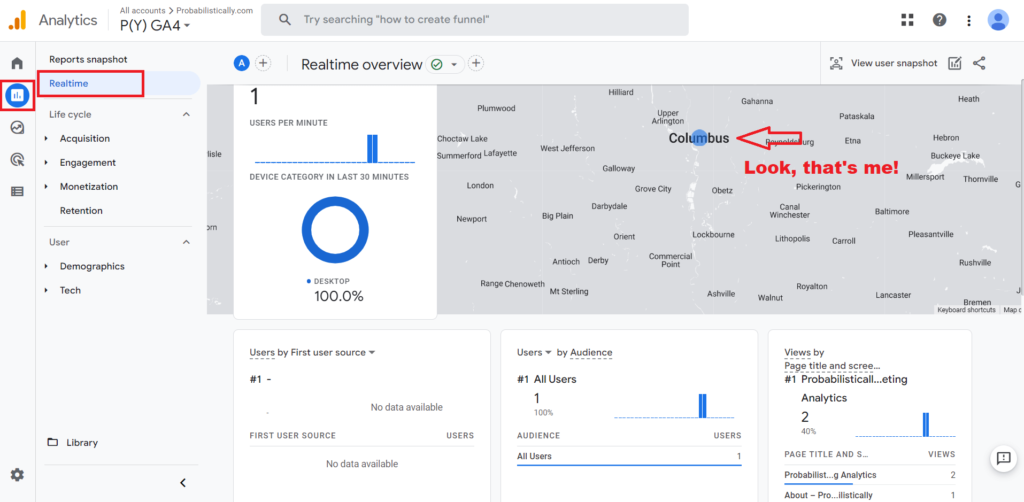
- Go to your website. Scroll through pages, click on links, watch videos.
- Logon to analytics.google.com, and choose your GA4 property.
- Choose Reports, then Realtime.
- You should see your traffic.

by Tanya Zyabkina
Tanya Zyabkina has over 15 years of experience leading analytics functions for multiple Fortune 500 companies in the retail and telecom industries. Her experience spans from qualitative market research in the fashion industry to determining the impact of promotions on subscriber behavior at a cable provider.
